I did not plan to do another tute so quickly, it just sort of happened....and this idea came to me.
I used to lose my embroidery needles all the time, I'd put one down to re-thread it, and then get side tracked. Consequence: another needle down the side of the sofa and a cross husband saying 'That's dangerous, someone could sit on that, etc etc!'.
To aid my plight a kind friend sent me a needle keeper which had a magnet stuck on the top. I can't tell you how useful this has been over the years - plus saving me a fortune in new needles.
I was racking my brain for a gift to give a stitching friend and this idea popped into my head. Like most of my ideas it arrived just before I went to sleep, so I spent the next half hour making notes and then couldn't nod off 'cos my head was buzzing!
Well, here's my prototype, which I thought I'd share. Instead of a magnet on the top, the whole thing is magnetic. You can pop your needle down on it anywhere and know it will stick.
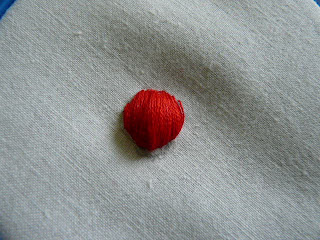
I created the little ladybird design so she could keep watch over the needles for me. Felt padding has been used to make her more three dimensional, but you can just stitch her with satin stitch if you don't want to do this.
a small piece of cotton fabric to fit a 5 inch embroidery hoop
a thin magnetic, self adhesive card
a small piece of mat board*
a piece of felt
all approx 3.5"x 2" or 9cm x 5cm (depending where you are in the world)
Strong thread for lacing or glue
For the embroidery:
stranded cotton in bright red, green and blue (or your own colour choice)
black Perle/Pearl Cotton
a small piece of felt
paper to make a template
Begin by cutting your mat board to fit the size of the magnetic sheet. It's easiest to do this on a cutting board with a scalpel/craft knife and ruler.
Then carefully peel off the backing and firmly stick the magnetic sheet to the mat board, and place to one side.
Prepare your embroidery fabric to fit a 5 inch hoop.
Now you are ready to begin the design.
Mark out the template for the ladybird's body padding on some paper.
Pin onto your felt
Cut out with small sharp scissors
Attach the smallest piece of felt to the centre of the ladybird's body with small stab stitches
Then apply the middle sized layer of felt the same way
Finally add the top layer, now you should have a nice rounded, padded shape.
Neatly cover the felt body with Satin stitch*
Use black Perle/Pearl cotton to make one long stitch to divide the 'wings'.
 | |||||||
Make 3 French or Chinese Knots* on each wing, as indicated on the
pattern. Finally, make a couple of straight stitches for the head and
two more knot type stitches for the eyes.
Complete the embroidery using Back stitch and/or Stem stitch* for the lines and lettering, and Satin stitch for the leaves.
When you've finished the embroidery, trim the fabric around the design leaving enough to wrap around to fix it to the magnetic base.
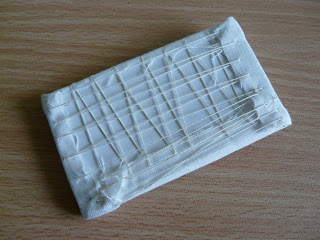
You can stick the fabric to the base with good quality glue if you're more dexterous than me, or if time is really short! I wanted a secure finish, and lacing something this small takes literally minutes to do - but it's up to you.
Using strong thread (I used crochet cotton) make a good knot and then lace the fabric vertically, in a 'ladder'style, pulling it taut and flat. Don't pull so hard that you break through the fabric, just a nice even tension. It is quite easy and I find it therapeutic! Check your design is positioned correctly before you begin, and also periodically so you can adjust it if you need to!
Tuck in and neaten/mitre the corners, making sure you take the thread through each one so they are nice and tidy, and lie flat.
When you 've finished, repeat the lacing horizontally so your embroidery is secure and fasten off by taking a few small stitches in the fabric and making sure all the thread is taut.
Finally, using good quality glue, carefully stick felt over the lacing to present a nice neat 'bottom'! I just used some red acrylic craft felt I had in my stash. Let it dry and you are done.
That's it! Needles enjoying their resting place, and a happy relaxed embroiderer/hand stitcher!
If you have a friendly local picture framer, you may be able to get some free offcuts of mat board, as the amount you need is so small. If you can't find it then using mount board or very strong card for the base would work too. For those in the UK - I got my magnetic card in a pack of 6 for under £3.00 at Hobbycraft.
Just a final plea. It's been great to welcome so many new visitors through Craft Gossip and other sites.Thanks so much to all of you who've left a comment, I do appreciate it.
Please let me know if you found this project helpful - I shall be ever grateful, as it gives me an idea where I should be steering this blog.
Thank you, and have a lovely weekend!
PS (*see Autumn card tutorial for these stitches)


LOVE it! What a terrific ladybird and a thorough tute - even telling where to get the magnetic stuff! Tophole!=)
ReplyDeleteThis is briliant Jules! I hope I take time to make one of these since I know someone who will really appreciate it....me! Thanks for this great idea.
ReplyDeleteWhat a clever idea ! This could make some nice presents for christmas... I will give it a try. Thanks a lot.
ReplyDeleteI think this idea is just absolutely wonderful,except I am not a sewer,by any means,I will try this with my stamps and inks,and some stickers,to make gifts for my Seamstress friends.Thanks,lovely idea!
ReplyDeleteWhat a lovely project, practical and pretty too! Thanks for sharing your great tutorial.
ReplyDeleteTerrific idea, even if you don't embroider. Just darning socks, I can lose a needle. My husband growls about that, too. Come to think of it, so did my dad. Anyway, it's so much sweeter to have an embroidered friend to watch the needles.
ReplyDeleteYou have a terrific idea! I embroidery and sew and always for get where I stick my needles. Thank you so much for your needle keeper project! I love it!
ReplyDeleteIt is a cool tutorial Jules. Thank you very much very generous of you.
ReplyDeleteThis is a great idea for a little gift for my crafty friends. One for me too.
ReplyDeleteYes it really is a good idea. I too get through so many needles. Can't wait to make one as soon as i can get the magnetic part.
ReplyDeletemany thanks for such a good idea.
This is absolutely gorgeous and such a simple idea. Having removed a self threading needle from my posterior after using a pc seat as a pincushion I think this is a must do project for me :)
ReplyDeleteRe use those unwanted refrigerator magnetic advertising cards which we all get from time to time. The thicker ones are better because they have the strongest magnetism.
ReplyDeleteI was thinking of using my plethora of refrigerator magnets for this project, too. I need a needle keeper in the worst way & this looks perfect! Thanks for sharing your idea. I'm visiting from Craft Gossip.
ReplyDeleteWAHOO! You got a tute on Craft Gossip! YAY!=)
ReplyDeleteYour needle keeper is a very unique creation
ReplyDeleteIt will come in handy because I do a lot of
hand sewing and constantly drop or lose my
needle!
Love this Jules! So clever!
ReplyDeletexx
Love this idea Jules. Beautiful work.
ReplyDeleteThis is a very good idea and I am going to make one for my friend who taught me how to embroider. I always try to think of something related to stitching for her. This is perfect! Thanks so much for sharing.
ReplyDeletetonilea
jiffy1212@aol.com
this is a marvellous idea!...thank u so much...very thoughtful of u posting this tutorial here . I feel only a hand embroiderer knows the difficulty of tracking needles
ReplyDeleteit is a new idea and unique too... many thanks for sharing
ReplyDeletei wonder where i can get those magnetic sheets in chennai
ReplyDeleteThank you so much for this. I will be using the ladybird as much as I can now I know how to make a pretty raised one :)
ReplyDeleteReally nice! Thank you for this idea. I can't wait to make some for my crafty friends. I have a ton of those business card magnets that I could use with some spray adhesive.
ReplyDeleteThank you so much for this lovely tutorial. Can't wait to try that ladybug!
ReplyDeleteYour blog provided us with valuable information to work with. Each & every tips of your post are awesome. Thanks a lot for sharing. Keep blogging, Milton barbarosh
ReplyDelete