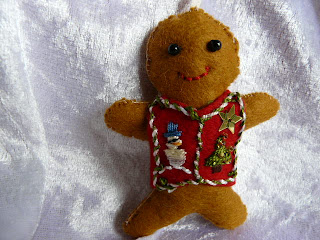
A bit of fun for you - more felt frivolity. There are loads of great Christmas decorations ideas around - so here's my contribution. A rather well dressed Gingerbread Man - or a Gingerbread Ted! Two for the price of one ( Buy One Get One Free or BOGOF as we charmingly say in the UK).
Add ears and a bow tie to create a little bear.
For two gingerbread/teds I used:
- a 9 inch square of felt in gingery brown, I used a wool/ acrylic blend
- scraps of red felt
- stranded cotton in cream, black, blue, brown and orange
- pearl cotton in cream and green
- embroidery needles in size 7 for stranded cotton and 4 for pearl cotton
- tiny beads, a star button and a star sequin
- black pearl beads for faces 4 4mm and one 3mm
- ribbon or cord for hanging loops
- toy stuffing
- regular hand sewing kit
- pencil/pen for marking designs on to the felt
- cardboard for pattern pieces
If you want to embroider the waistcoat, stitch it first using green pearl cotton for the tree. Add a tiny trunk using one strand of brown thread in straight stitches, finally use a few tiny beads for baubles. I added a star sequin. The snowman is stitched in straight stitch with cream pearl cotton, and his hat is straight stitch in one strand of blue stranded cotton. I made a tiny face with black Chinese knots for coal eyes and a carrot mouth - but you may think this is overkill! Here is the placement of the wee designs.
I back stitched around the vest in cream and whip stitched in green to add to the festive feel.
I attached the vest to the top body piece with 4 French knots in green pearl cotton, (one in each corner) before stitching
the two body pieces together.
To make up: button hole stitch around the two body pieces using one strand of
cream thread. Don't forget to leave an opening for stuffing! Stuff
lightly, it doesn't take much.
Cut pieces of ribbon or cord twice the length you
want to make a hanging loop. Fold in half and pop the two cut ends into the top oof the head. Enclose securely by stitching through the ribbon. I just buttonholed through the lot.
To add Ted's ears, position them on the head between the 2 body pieces and stitch through all three layers. This will make them nice and secure.
Place the eyes as on the pattern diagram. I'm just showing Ted's face here as it has more 'bits'. Ted's eyes are a bit closer together to give a more 'beary' look. Stitch through each eye about three times.
Then add his nose and complete his mouth using 2 strands of black stranded cotton.
I back stitched around his bow tie and added some bling so he didn't feel left out.
Here they are - (Ginger looks a bit smug.)
Ted's more soberly dressed - but he could have a glam waistcoat too if you like! Meanwhile he is making do with his starry bow tie. I didn't have a sparkly button so I just painted this one gold and he doesn't seem to mind.
They don't take long to make, you could dispense with the embroidery if it's too much faff; just do running stitich round the shapes for a more folksy look, or even machine stitch and stick on some embellishments.
So there you are - Ted and Ginger - Putting on the Ritz.....


Hehe... Jules these are wonderful. I want to play and make some gingerbread men and bears! ;-)
ReplyDeleteThey remind me of when I was at junior school. I remember my first sewing project was to make felt dolls like these, but my stitches were not as neat as these little guys.
Sorry I have been away for so long and missed some of your other posts. Your fairies and the students dolls are precious. Lovely work!
Thank you for your kind message.
Hugs,
Jo.
xx
Jules this is a darling ornament. Thanks so much for the tutorial. I shall mention it in my blog.
ReplyDeleteThis is a really cute craft project!
ReplyDelete